
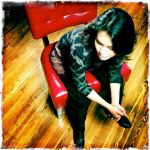
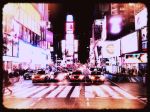
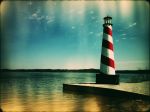
“Waiting for Dinner”
Houlihans Restaurant, Hershey, Pennsylvania
Thursday, April 7, 2011
iPhone 4 Camera
Hipstamatic app
Lens: John S
Film: Kodot XGrizzled
Flash: Off
MY EXPERIENCE WITH USING THE HIPSTAMATIC APP
55 days into my 365 Day iPhone Photography Project, I felt it was time to start writing about some of the camera phone applications I’m using and that are available to the public. These Apps range in cost from free to several dollars, and some are fads, but others genuinely can aid someone interested in producing better photographs with their camera phones. Here’s a list of the Apps I’ve purchased so far and uploaded onto my iPhone 4 camera:
Hipstamatic
Swanko Lab
Tilt Shift Generator
Plastic Bullet
Panoramic Auto Stitch
12.0 MPX
Perfect Photo
Picture Show
Clear Cam
Camera+
Dynamic Light
Instagram
Photo fx
Over the next year, I’ll write about these, and other, Apps from a personal perspective, concerning what it’s like to work with them on the run. This blog isn’t meant for professionals, as much as for people who just want to improve their camera phone photographs. Today, I’ll stick with the Hipstamatic. I won’t share all the details of this App, but more about how I use it, and some ways I work around its quirks.
In general, I really like this App. And it’s what initially ignited a surprise creative burst in me and a desire to jump into my own 365 Day Hipstamatic project. It mimics the toy cameras of yesteryear and gives one the ability to “choose” certain lenses, film stocks and flashes, shooting square photos, reproducing the images of antiquated analog cameras. Each film, lens and flash also creates different effects and borders around the prints. I like the fact that one can also purchase extra accessories down the road, when ready for something new. And it appears that Hipstamatic will continue to create new accessories in the future. I purchased the basic Hipstamatic App package for $1.99, along with other film stocks and lenses for ninety-nine cents each.
What I find interesting is that for as long as the photography camera has been around, and even moreso wtih with the digital revolution, the general desire has always been to improve photographic quality by reducing grain and gaining greater control over depth-of-field. The unique characteristic of camera phone Apps like the Hipstamatic is that it degrades the image in various ways. And makes it impossible to gain control over manual focus. Yet people are going crazy in shooting everything with these Apps without thinking through how and why they are using them. Like anything else, they are a tool. And tools can be used well, or poorly.
Interestingly, the entire history of the Hipstamatic might be a myth employed for a brilliant viral internet campaign. Follow this link to read the fascinating story.
http://lifeinlofi.com/2010/12/23/news-wausau-city-pages-uncovers-the-real-hipstamatic-backstory/
Either way, it received Apples App of the Year award.
Several people have told me that they have begun shooting with the Hipstamatic App since following my project. That makes me happy. And others have turned me on to other Apps that I will experiment with and pass along to you. I won’t go into all the film stocks, lenses and flashes, today, simply because part of the fun is exploring all the possibilities this App offers. But I will show four of my Hipstamatic shots, some untouched, side-by-side with a few alterations I made in iPhoto, for those who want help in adjusting shots for a stronger impact. Some of you may not have Apple computers and iPhoto, but any general photo editing software will give basic abilities to alter an image. I’m choosing iPhoto for this project, in general, because it’s in keeping with the basic premise and purpose I set for this project: to shoot with the rudimentary iPhone 4 camera and Apps, as the most basic photographic tool in the hands of the mass public, in order to create artistic images.. Photoshop can get too deep for this project, but for those who know how to use it, I’ll throw in a special tip at the end of the post for increasing the resolution of your low-res prints.
EXAMPLE #1
Here are two versions of today’s Photo of the Day: one untouched (left) and one color corrected (right).


As you can see, the untouched photo has an overwhelming greenish cast. Some people may like this as an effect. Personally, I don’t. It comes off eerie and reminds me too much of the 60s and 70s, which is what it’s trying to do. So I do a little tweaking in iPhoto. Here’s what I did to the shot on the right. I’m only listing settings that I changed. All settings not listed are left at their default settings.
Exposure: .40 (up from 0)
Definition: 56 (up from 0)
Shadows: 24 (up from 0)
Sharpness: 45 (up from 0)
Temperature: -38 (down from 0)
Tint: -100
Grant it, I went a bit extreme on my settings. But using the Hipstamatic can do extreme things to your work, so it takes extreme settings to bring it back to normal. But it’s not always possible to do so. And this is an extreme case of indoor, night-time lighting.
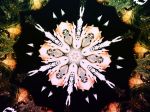
EXAMPLE #2
Here’s another example from Day 3 of my project.
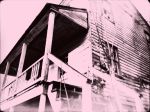
“Watcher By My Bed”
Monday, February 14, 2011
Lens: John S
Film: Alfred Infrared
Flash: Off
Once again, the original is on the left and the color corrected version on the right.


The original version is too red for me. So I toned it down and made it more dark chocolate in hue. Also, the Alfred Infrared film produces a white border around this photo.
Here are the iPhoto settings for the photo on the right.
Saturation: 16 (down from 50)
Definition: 100 (up from 0)
Much of it comes down to personal taste, but I’m giving examples for the “average Joe” who just wants to shoot photos creatively, but doesn’t quite know how to simply alter a photo from their camera/Apps for a better final product.
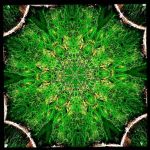
EXAMPLE #3
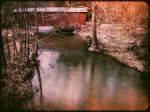
Here’s another example from an outdoor shot for Day 12.
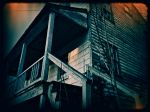
“Star Barn Reborn”
From the album: Star Barn Reborn
Wednesday, February 23, 2011
Lens: John S
Film: Kodot XGrizzled
Flash: Off


It may not be easy to tell from this small reference photo, but the original photo on the left is very green, again. The iPhoto settings for the improved photo on the right are:
Contrast: 23 ( up from 0)
Definition: 25 (up from 0)
Sharpness: 23 (up from 0)
Tint: -59 (down from 0)
My final settings pop the blue sky and the browns, blacks, caramels and blues in the wood. And I also pumped up the definition and contrast and sharpness to accent the wood grain.
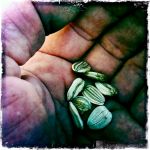
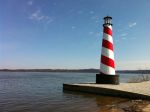
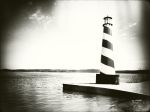
EXAMPLE #4
Here’s one more example from Day 29:
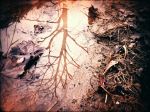
“The Guardians”
The Susquehanna River
Harrisburg, Pennsylvania, USA
From the album: Harrisburg Flood: Sepia
Saturday, March 12, 2011
Lens: John S
Film: Kodot XGrizzled
Flash: Off
Additional lens: Eye Scope – Mobile Zoom Lens for the iPhone 4


I actually really like both versions of this shot, but in the end the right one won out, simply because it was warm and hopeful. And I had already posted several shots similar to the photo on the left in color and tone, so I went with the bold variety shot.
Here’s the iPhoto settings for both photos:
Left photo: Right photo:
Exposure: .15 .40
Saturation: 66 0
Definition: 11 11
Shadows: 18 67
Sharpness: 22 22
Temperature: 0 100
Tint: -42 -100
ADJUSTING SETTINGS TO APP
Here are a few settings you should know about. Go to Settings in your iPhone. Scroll down to the Hipstamatic App and open it. Click on Viewfinder Mode and click Precision Framing. The Hipstamatic does not provide exact framing for shooting exactly what you see in the viewfinder, but at least shooting in this mode will increase your chances of framing your shot well. Also, unless you are learning the app and want to experiment willy-nilly with all the accessories, I recommend turning off Shake to Randomize. It’s rather annoying to anyone who knows what they are trying to create, because simply by bumping or shaking the camera, it completely changes your choice in lens, film stock and/or flash. Again, this can be good for learning about the various options you have, but once you know your likes and dislikes and how the various accessories affect your final product, definitely turn the button off. And lastly, turn on the Auto-Save to Library. The Hipstamatic saves your prints in it’s own app area, and you can simply click on the image, then click the left arrow button to open a new window where you can: Share on Facebook, Upload to Flickr, Post to Tumblr, Send in Email, or Save to Photo Library. If you don’t plan to keep most of your shots, then you can save them one at a time here. Otherwise, use the Auto-Save to Library.
INCREASING THE RESOLUTION OF LOW-RES SHOTS
First of all, always, always, always, (did I say always) shoot with the highest resolution possible with digital cameras. Most people don’t realize you can change the settings of camera phone apps from low, to medium or high resolution. For the Hipstamatic, you don’t do it in the phone Settings area, you actually change the quality of the photo where you choose the lens. After opening the app, click on the little curved arrow on the bottom right of the screen. This should bring up your lens selections. By scrolling sideways, you can see your options. When you find one you like, simply stop. You should see a “lever” on the left of the lens. With your finger, slide the lever up and down. The lowest position is for low quality. The middle position is for medium quality. And the highest position is for high quality images.
Also, you can do something in post to improve the resolution for printing larger prints, if you know your way around Photoshop. I learned this trick from my friend Ally McKay. She and her husband David are good friends and terrific photographers in Sacramento, CA. You may visit their website here:
http://www.mckayphotography.com/
Basically, camera phone shots aren’t the highest mega-pixel cameras on the market. So a little fix (but by no means better than buying a higher-res camera) is to go into the IMAGE setting in Photoshop and increase the resolution by 110%. Keep doing this until you reach the size of the photograph you want to print. Although it’s controversial and there are various theories about how to best up-rez a photo, Ally highly recommends that by increasing the photo by 10%, it is the best formula for computing and increasing pixels/resolution without damaging the image. I’ll keep you posted as I continue to experiment with this process.
Here’s another blog post where a photographer walks you though up-rezzing by 25% increments.
http://www.have-camera-will-travel.com/field_reports/how_to_up-rez_an_image.html
HEADS-UP: THE GOOD WITH THE BAD
One major issue I’ve experienced with the Hipstamatic App is this: it allows you to take up to nine photos at a time, which get stored in a queue while processing. It takes several minutes for the camera to catch up and process all the shots. But sometimes, with no warning, the App will shut down and when you open it back up, it will halt for a moment with a fatal message: “wiping lens’, but what it really means is this: “erasing all photos in the queue”. I can’t tell you how many dozens of shots I’ve lost because of this App’s quirky malfunction. But it’s not enough of a hassle for me to toss it out. I figure the company will eventually fix the problem. In the meantime, either slow down while shooting, so the App can keep up with you, or take the risk and keep the queue filled up. It’s a crap shoot to keep the queue filled, but maybe it’s just an issue with my camera.
And one last warning: certain lens and film stock choices will make people look very bad. Unless you want to turn family and friends against you, I suggest you erase those shots, or learn which film stocks or lenses turn people green or add 40 years to their faces–and then avoid them like the plague when shooting portraits.
CONCLUSION
Overall, I really enjoy using the Hipstamatic. I never liked square formats, but for some reason I’m really digging it now with this App. It’s challenging my creative eye in new ways. And I love the X-Grizzled ragged-edge border it can give to the photos. But I also realize that one of the reasons I like it is because its new. Once it gets familiar, I’m sure I’ll move on to something else new and exciting. But as long as the company produces new accessories, they might have me hooked for years to come. And for now, it’s fun and adding new dimensions to my creativity.


Day 33 – In The Land Of Milk And Honey – Kevyn Bashore’s iPhone Photo of the Day
“In The Land Of Milk And Honey”
Wednesday, March 16, 2011
iPhone 4 & Panarama Auto Stitcher App
In light of the unimaginable natural disasters that struck Japan this past week, it behooves us all to take stock of just how fortunate we are in this county. With 4,000 confirmed dead, possibly tens of thousands still missing, and devastations still unfolding, from the earthquakes, tsunamis, and potential for nuclear power plant meltdowns, and with world-wide ramifications yet to unfold, an estimated 140,000 people are stranded and quarantined within the radiation danger zone, waiting in lines for over 12 hours just to buy food and necessities.
Here in America, we live in a country where most of our citizens are richer than the rest of the world. We have only to walk down to our local grocery store to realize just how many choices and blessings we have here. In just the cereal aisle alone, we are presented with a dizzying display of breakfast brands. Overwhelming, in fact. And unless one travels around the world to see just how few choices most people have in cereal, it’s easy to think our extravagance is the norm.
I’m seeking to allow the hardships, pain and suffering of all those facing these tragedies to instill in me a new sense of solemnity, reflection and gratitude. It’s easy to grow fat and lazy while grazing in the land of milk and honey. Let’s seek to do otherwise.
Note: While shooting the series of shots for this panoramic image (20 shots, to be exact), I was approached by the store manager who forbade be from taking any photos in the store. Very interesting. Prior to his demand, I was able to snag just enough to stitch this shot together using the Panoramic Auto Stitch phone app, but I find it interesting that in an age when everyone is carrying a cell phone camera, how can stores and establishments possibly enforce a no-photo-taking policy? Stay tuned for an interesting battle ahead over public freedom vs. corporation rights.